Discover how AppleScript and bash scripting seamlessly merge to create powerful, user-friendly automation applications on macOS. This essential guide reveals the simple steps to transform complex command-line tools into accessible, double-clickable solutions.
Imagine being a bash scripting expert who frequently creates automation solutions for friends and family who might not be comfortable with the command line. Even with a perfectly crafted script that solves their problem, the prospect of opening Terminal and running commands can be daunting for many users. This often leads to the frustrating cycle of providing remote support or manually performing tasks that could easily be automated. Fortunately, AppleScript, a longstanding automation technology on macOS, provides an elegant bridge between powerful bash scripts and a user-friendly graphical interface that anyone can use with a simple double-click.
AppleScript, originally introduced with Mac OS 7, was designed with readability and accessibility in mind, even by the standards of users from earlier computing eras. Its core purpose is to interact with the macOS Finder and other applications to automate complex workflows. In 2026, this integration remains a powerful tool for developers and power users looking to package command-line functionality into accessible applications. The Script Editor application, found in the Utilities folder, serves as both a text editor and an Integrated Development Environment (IDE) for crafting AppleScripts. Its comprehensive Help menu and Language Guide are invaluable resources for both beginners and experienced scripters.
Integrating Bash Commands into AppleScript
Bash provides surgical precision for interacting with the macOS operating system, allowing you to script nearly any system-level task. The traditional method of running a bash script—ensuring executable permissions, navigating to its directory in Terminal, and executing it—is a barrier for non-technical users. AppleScript eliminates this friction through the do shell script command.
Here is the straightforward process for embedding bash functionality:
-
Open Script Editor and create a new document.
-
Use the
do shell scriptcommand followed by your bash command in quotes.```applescript
do shell script "ls -la /Applications"
```
-
For multiple commands, separate them with a semicolon within the same string.
```applescript
do shell script "cd ~/Desktop; mkdir NewFolder"
```
-
To execute an existing script file, simply reference its full path.
```applescript
do shell script "/Users/Shared/BackupScript.sh"
```
-
For commands requiring administrator privileges, you can embed credentials (though this should be done cautiously).
```applescript
do shell script "sudo systemsetup -setremotelogin on" user name "AdminUser" password "SecretPass" with administrator privileges
```
After writing your script, you can test it using the Play button in Script Editor to check for syntax errors. The final, crucial step is to save the file. Under File Format, select Application. This creates a standalone .app file that runs your embedded bash script with a simple double-click, no Terminal required.

Creating Drag-and-Drop "Droplets"
One of AppleScript's most user-friendly features is the ability to create Droplets. These are application-style scripts that accept files or folders dragged directly onto their icon. This is perfect for batch processing tasks like resizing images, converting file formats, or organizing documents—without requiring users to type any file paths.
Creating a Droplet involves a specific handler structure:
on open dropped_item

  -- Your script commands here, using 'dropped_item' as the variable for the dragged file.

  do shell script "echo 'File was dropped!'"

end open
The variable name dropped_item can be anything you choose (e.g., dropped_file). AppleScript automatically assigns the path of the dragged file to this variable. You can then process this file using further do shell script commands or native AppleScript instructions.

A Practical Example: Making Files Read-Only
Let's combine these concepts into a practical, useful Droplet. Suppose you want to quickly give a friend a read-only copy of a document to prevent accidental edits. You can create a Droplet that removes write permissions from any file dropped onto it.
A key technical detail is that AppleScript and bash use different path formats. AppleScript uses the older HFS format (with colons, e.g., Macintosh HD:Users:Name:file.txt), while bash uses the POSIX format (with forward slashes and escaped spaces, e.g., /Users/Name/file.txt). The script must convert between these formats.
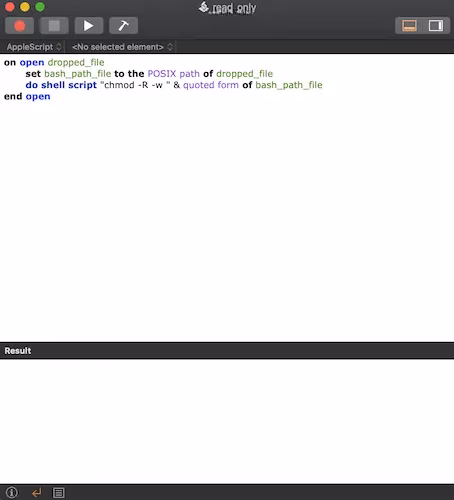
Here is a complete, functional Droplet script for this task:
on open dropped_file

  -- Convert the HFS path from AppleScript to a POSIX path for bash

  set bash_path_file to the POSIX path of dropped_file


  -- Use the bash 'chmod' command to remove write permissions recursively.

  -- 'quoted form of' ensures the path is handled safely, even with spaces.

  do shell script "chmod -R -w " & quoted form of bash_path_file


  -- Optional: Notify the user the task is complete.

  display dialog "Write permissions removed from the file!" buttons {"OK"}

end open
This script elegantly handles the path conversion and executes the chmod -w command, making the file read-only. The -R flag applies the change recursively if the dropped item is a folder.
Enhancing Bash Scripts with AppleScript
The integration works both ways. You can also call AppleScript from within your bash scripts using the osascript command. This allows you to add interactive, graphical elements to your command-line tools.
For example, you can prompt a user for input directly from a bash script:
#!/bin/bash

# Get user input via an AppleScript dialog

USER_INPUT=$(osascript -e 'text returned of (display dialog "Enter your name:" default answer "")')

echo "Hello, $USER_INPUT!"
Or display an alert notification when a long-running script completes:
#!/bin/bash

# ... complex backup script ...

osascript -e 'display notification "Backup completed successfully!" with title "Task Done"'
Comparison: AppleScript vs. Automator
As of 2026, AppleScript remains a robust tool for scripters, but it's not the only automation game in town. Automator, also built into macOS, offers a visual, drag-and-drop approach to building workflows. Here’s a quick comparison:
| Feature | AppleScript | Automator |
|---|---|---|
| Interface | Code-based, textual language. | Visual, action-based workflow. |
| Learning Curve | Steeper; requires learning syntax. | Gentler; intuitive for beginners. |
| Power & Flexibility | Very high; can script complex logic and app interactions. | High for predefined actions; may require AppleScript/Shell for complex tasks. |
| Best For | Programmers, detailed app control, packaging bash scripts. | Beginners, quick visual automation, simple file/folder tasks. |
For those new to automation, Automator can be a fantastic starting point. Many Automator workflows can even include Run Shell Script and Run AppleScript actions, blending all three methods. However, for the specific task of creating a double-clickable app from a bash script or a drag-and-drop file processor, AppleScript provides a direct and powerful solution that is hard to beat.
Ultimately, the synergy between bash and AppleScript empowers creators to build incredibly useful tools. You can leverage the raw power and precision of the Unix command line and deliver it through an interface that is accessible to every Mac user. Whether it’s a simple batch renaming tool, a media conversion droplet, or a system maintenance utility, this combination ensures your automation helps everyone, not just those who speak the language of the Terminal. 😊