Discover how to create an Excel student data entry form with VBA for seamless automation and error-free data management in this practical guide.
As an avid Excel user, I've always been amazed by how Visual Basic for Applications (VBA) can turn repetitive tasks into seamless automations. Recently, I took on a project to build a student data entry form for my university's administration team, aiming to replace manual spreadsheets with a sleek, user-friendly interface. This experience not only saved hours of data entry but also reduced errors significantly. In this article, I'll share my step-by-step process, from setting up the workbook to writing the VBA code, all while ensuring the form looks professional and functions flawlessly. Whether you're new to VBA or looking to enhance your skills, this guide will help you create something similar with ease. 📊✨
Setting Up the Workbook
First things first, I started by opening a new Excel workbook. To make it macro-enabled—a must for VBA automations—I saved it with a descriptive name like "StudentDataEntry" and changed the file type to Excel Macro-Enabled Workbook. This ensures all my VBA code runs smoothly without compatibility issues. Next, I added two sheets to organize everything: one named "Home" for the main interface and another called "Student Database" to store all the entered data. This separation keeps things tidy and makes data management a breeze. Here's how the initial setup looked in my workbook:

Adding a Button to Launch the Form
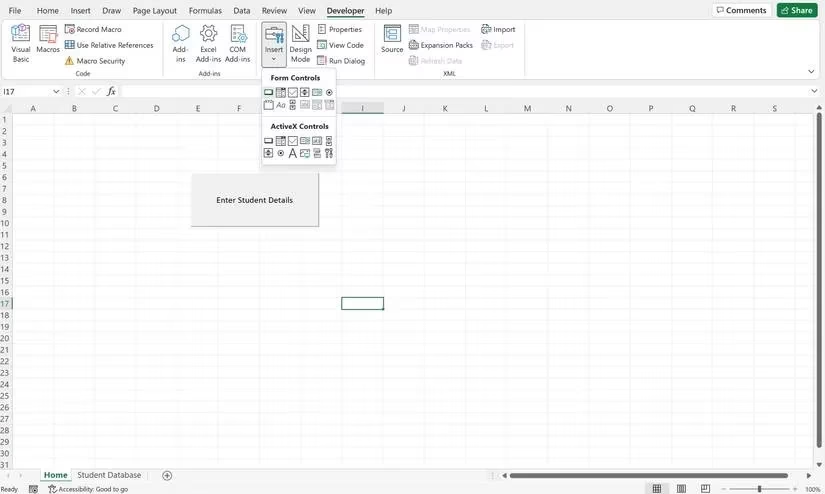
With the sheets ready, I moved to the "Home" sheet to add a button that would open the user form. I navigated to the Developer tab—if you don't see it, you can enable it in Excel Options—and selected the Button option from the Insert drop-down. After placing it on the sheet, I right-clicked to rename it something intuitive like "Open Form." Then, I assigned a simple macro to it by clicking "New" and entering the code below. This macro triggers the form to appear with just a click, making it super accessible for end-users.
Sub Button1_Click()

UserForm.Show

End Sub
Here's a glimpse of the Home sheet with the button in place:
Designing the User Form
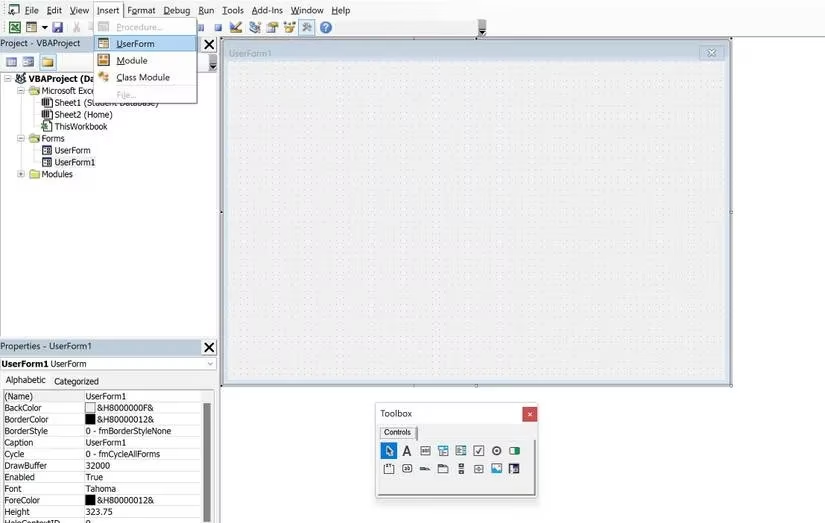
Now for the fun part—designing the form itself! I pressed ALT+F11 to open the VBA editor, a powerful tool that feels like a developer's playground. Under the Insert tab, I selected UserForm, which gave me a blank canvas to work with. The toolbox that popped up had all the essential controls, like frames, labels, and text boxes. I began by adding a frame to group related elements, resizing it to fit neatly. For instance, I inserted a frame and within it, added labels for "Application Number" and "Student ID," followed by text boxes for user input. Renaming these was straightforward using the Properties window—just select the control and update the "Caption" or "(Name)" field. This step-by-step approach made the form intuitive and visually appealing.
Adding More Controls and Fields
To capture comprehensive student details, I expanded the form with additional frames. In one vertical frame, I added 10 labels and text boxes for key information like:
-
Name
-
Age
-
Address
-
Phone
-
City
-
Country
-
Date of Birth
-
Zip Code
-
Nationality
-
Gender
For the gender field, I included option buttons labeled "Male," "Female," and "Custom" to ensure inclusivity. Another frame held labels and text boxes for course-related data, such as:
-
Course Name
-
Course ID
-
Enrollment Start Date
-
Enrollment End Date
-
Course Duration
-
Department
I also added a section for payment details with a label asking "Do you wish to update the Payment details?" and option buttons for "Yes" and "No." Below that, I included combo boxes for "Payment Received" and "Mode of Payment," which I populated later with drop-down options. Finally, I inserted three buttons at the bottom: "Save Details," "Clear Form," and "Exit" to handle user actions. The form was starting to look professional and functional!

Writing the VBA Code
With the form designed, it was time to breathe life into it with VBA code. I double-clicked the "Save Details" button to open the code module. Here, I wrote a subroutine to validate inputs and save data to the "Student Database" sheet. The code first checks for numeric values in fields like Application Number and Student ID to prevent errors. If text is entered where numbers are expected, it shows a message box alerting the user—this simple validation saved me from countless headaches! Then, it calculates the next empty row in the database and pastes the form data into the correct cells. For gender, it captures the selected option button, and if "Yes" is chosen for payment details, it prompts the user to fill them in. Here's the core part of the code I used:
Private Sub CommandButton2_Click()

Dim sht As Worksheet, lastrow As Long

Set sht = ThisWorkbook.Sheets("Student Database")

lastrow = sht.Range("a" & Rows.Count).End(xlUp).Row + 1

' Validation checks

If VBA.IsNumeric(txtApplicationNo.Value) = False Then

    MsgBox "Only numeric values are accepted in the Application Number", vbCritical

    Exit Sub

End If

' Similar checks for other numeric fields...

' Paste data to sheet

With sht

    .Range("a" & lastrow).Value = txtApplicationNo.Value

    .Range("b" & lastrow).Value = txtStudentID.Value

    ' And so on for all fields...

End With

' Handle gender and payment options

If optMale.Value = True Then sht.Range("g" & lastrow).Value = "Male"

If optFemale.Value = True Then sht.Range("g" & lastrow).Value = "Female"

If optYes.Value = True Then MsgBox "Please select the payment details below"

End Sub
For the "Clear Form" button, I added code to reset all fields, making it easy for users to start fresh without closing the form. This involved setting each text box and option button to empty or false values. The "Exit" button simply unloads the form with Unload Me, providing a clean way to close it. To populate the combo boxes, I used the UserForm_Activate event to add items like "Cash," "Card," and "Check" for payment modes. This ensured the drop-downs were ready as soon as the form opened.
Finalizing and Testing the Form
Before deploying it, I tested everything thoroughly. I entered sample data, clicked "Save Details," and verified that it appeared correctly in the "Student Database" sheet. The clear and exit buttons worked like a charm, and the validation messages popped up as expected. Here's the completed form in action:

This project reinforced how versatile VBA is—it's not just for forms but for tasks like merging sheets or automating reports. In 2025, with AI tools on the rise, VBA remains a reliable choice for Excel power users. My key takeaways? Start small, validate inputs, and always test! 🚀 Now, go ahead and build your own form; it's a rewarding skill that pays off in efficiency.