Discover the revolutionary iTunes automation trick using the hidden 'Automatically Add to iTunes' folder to effortlessly streamline your music library management and enhance your listening experience.
Let's be real, as a music lover in 2026, my collection is scattered across downloads from everywhere. But the real chore isn't finding the tunes—it's getting them neatly into my music library. I used to spend ages manually dragging files into iTunes (yes, it's still my go-to organizer!). But then I discovered this game-changing automation trick using iTunes' own hidden feature, and it completely transformed my workflow. It’s all about working smarter, not harder, to get back to what matters: listening to music.
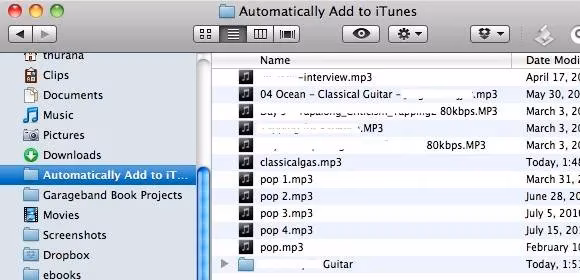
🎵 The secret sauce? A magical folder called "Automatically Add to iTunes". This isn't some third-party app; it's built right into iTunes! Any supported audio file you drop into this folder gets instantly imported into your iTunes library. No manual adding, no fuss. The first step is finding it. Once you do, I highly recommend adding a shortcut to your Mac's Finder sidebar for instant access. Seriously, it’s a lifesaver.
But here's where the real automation begins. Why drag and drop when you can make the downloads go straight there? Let me walk you through my setup.
Step 1: Automating Torrent Downloads with Transmission
Most of my Mac-using friends swear by Transmission for torrents, and its grouping feature is perfect for this.
-
Open Transmission Preferences (
Cmd + ,). -
Go to the Groups tab. You can rename an existing group or create a new one just for music.
-
Check "Custom Location" and navigate to select that "Automatically Add to iTunes" folder. If you put it in your sidebar, it's super easy to find!

Now, the magic rule:
-
Check "Assign group to new transfers based on criteria".
-
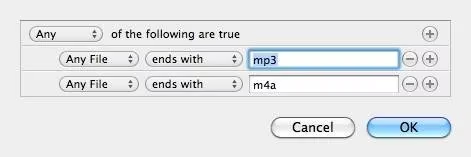
Click Add to create a rule. Set it to: "Any File" + "ends with" + ".mp3" (or .flac, .m4a, etc.). You can add multiple rules for different music formats.
For ultimate laziness (the good kind!), enable "Auto add" under Preferences > Transfers > Adding. Set it to watch your Downloads folder for .torrent files. Now, you just click a torrent link online, and the downloaded music files automatically route to the iTunes folder and import themselves. It feels like magic every time!
Step 2: Handling Direct Downloads & Other Sources
What about files from friends, bandcamp, or other direct downloads? If your download manager has smart filtering (like iGetter used to), you can set it to save music files directly to the Automatically Add to iTunes folder. Easy peasy.
But what if your downloader doesn't have that feature? Don't worry! This is where a little file management automation comes in clutch. While tools like Hazel exist, I want to highlight the concept with a classic example: using a folder action watcher. The goal is to have a helper app monitor your main Downloads folder and move any music file it finds.
The process is always similar:
-
Pick Your Tool: Choose an automator app that supports folder actions.
-
Create a Rule: Set it to watch your Downloads folder.
-
Define the Trigger: Look for files ending in
.mp3,.flac,.alac,.m4a, etc. -
Define the Action: Move those matching files to the "Automatically Add to iTunes" folder.
Once set up, it runs silently in the background. You download a song from anywhere, and moments later, it's vanished from your Downloads and is already being processed by iTunes.
The Beautiful Result
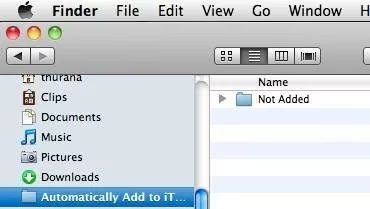
Open iTunes, and voilà! Your new songs are already there, tagged and ready in your library. Any non-supported files that came along for the ride (like text files or images) get neatly sorted into a "Not Added" subfolder, so your library stays clean.
This whole system has been a total game-changer for me. It turns a tedious organizational task into a completely hands-off process. The initial few minutes of setup save me hours over time. In 2026, with music coming from more sources than ever, having a centralized, automated hub like this is essential.
✨ My Pro-Tips for 2026:
-
Keep Rules Updated: New audio formats pop up! Remember to add extensions like
.opusor.dsdto your rules if you use them. -
Cloud Sync Consideration: If you use iCloud Music Library, remember these auto-added files will sync across your devices once imported.
-
Tagging is Key: Automation gets files into iTunes. For a pristine library, consider a batch tag editor for untagged downloads before they hit the auto-folder, or use iTunes' own Get Info features afterward.
So, that's my secret to a self-organizing music library in 2026. Do you use iTunes or another app? Have you set up any cool automation flows for your media? I'd love to hear your hacks and tips—share them below! Let's all spend less time managing files and more time enjoying the music 🎧.